Project 2: System Calls
Due: Monday, October 15, 11:59:59 p.m.
Table of Contents:
Objective
One of the major components of an operating system is its system call interface. The system call interface allows user programs to request services from the operating system. In this project, you will learn how to use some of the system calls provided by the BIOS. You will then write your own system calls to print a string to the screen, read text from the keyboard, and read a sector from the disk. These system calls will then be used in later projects to create an interactive shell and a file system.
Background
A system call is an interrupt generated by a program. A user program will typically make a system call to request some service from the OS. On an Intel processor, user programs make system calls by executing the int assembly language instruction. Parameters for the system call, such as what to print, where to place text read from the keyboard, or which sector to read from the disk, are passed to the OS via the general-purpose registers
AX, BX, CX, DX. Each of these registers is 2 bytes
(16-bits), and we can access high
and low bytes of each register using the
suffix "H"
or "L" (i.e., AH, AL, BH, BL, CH, CL, DH, DL).
The process making the system call is responsible for knowing
- what is expected in each general register for the system call and
- placing the appropriate values in the appropriate registers.
The operating system can also return a value to the process that indicates if the system call was completed successfully or not. The returned value may also indicate something about the result of the system call, for example, it may indicate the number of characters that were read from the keyboard.
Getting Started
I created a new VM because of some issues with how bochs was compiled originally. (This one is slightly smaller, but not enough smaller.) Username and password are the same. You will need to reinstall any software that you installed previously.
- Rename the VM from project 1 by clicking on "Settings" and name it "csci330-project1".
- If you're on your own
machine, Download the VM. (The VM is 4GB,
so it's slow.) If you're on the lab machines , you need to
use one of the machines in the advanced lab and use
/csdept/courses/cs330/handouts/csci330.ova - Import the appliance into VirtualBox.
Set up to use git in the VM
Set up git to know who you are by running the commands
below. (Update the information in the commands.)
git config --global user.email "you@example.com"
git config --global user.name "Your Name"
Get the starter code
Go to the GitHub Assignment to set up your repository.
Start your VM, open a terminal, and clone your GitHub repository
When finished, you should have a directory
named project2_username containing the files:
bootload.asm– assembly code for the boot loader.kernel.asm– assembly language routines you will use in your kernel.opsys.bxrc– bochs configuration file.message.txt– a small text file used to test your read sector system call.kernel.c– the start of a kernel, with a main, putChar and putStr functions (you can copy in your putChar and putStr functions if you prefer)run.sh,build.sh(which just calls make), andMakefile– scripts to compile, link, image, and run your OS.
Heads Up
While you're writing your code, note if there are places where you're writing repetitive code, and consider writing a function.
Step 1: BIOS Routines
In this part of the project you will implement several functions in the kernel that use software generated interrupts to invoke BIOS routines. You will use the BIOS to print a string to the screen, to read a string from the keyboard, and to read a sector from the disk. In the next part of the project, you will setup a system call interface to make these routines available to user programs.
Printing to the Screen via the BIOS (Interrupt 0x10)
In the previous project, you saw how to print to the screen by directly writing characters to the video memory. The problem with that approach is that you have to keep track of the cursor position yourself, as well as handling scrolling when you reach the end of the page. Alternatively, the BIOS provides an interrupt service routine (ISR) that will print to the screen, update the cursor position, and scroll the screen if necessary.
The BIOS ISR for the video display functions is accessed via
interrupt 0x10, i.e., entry 0x10 in the
machine’s interrupt vector holds the address of the BIOS ISR for
interacting with the video display. The action performed by this ISR
depends upon the values that are placed in the
registers before the interrupt is generated. Of particular
use to us, if an interrupt 0x10 is generated with value
0x0E in the AH register, the ASCII character
in the AL register will be printed to the screen at the
current cursor location and the cursor location will be updated. If
you are interested, a complete list of all of the BIOS interrupts and
how to invoke them
is available.
Unfortunately, registers cannot be modified directly from C code
nor can interrupts be generated directly from C code. To allow you to
set the register values and generate an interrupt from C, a function
named interrupt has been added to
the kernel.asm file. This interrupt function takes five
parameters: the interrupt number (e.g., 0x10), and the
parameters for the interrupt that are to be passed in
the AX, BX, CX,
and DX registers, respectively. If the
interrupt function were written in C, its prototype would be:
	int interrupt(char irq, int ax, int bx, int cx, int dx);
     // irq => InterruptReQuest
To use interrupt 0x10 to print out the letter 'Q', you
could do the following:
    char al = 'Q';
    char ah = 0x0E;
    int ax = ah * 256 + al;
    interrupt(0x10, ax, 0, 0, 0);
This works, in part, because chars are one byte while ints are 2 bytes
(in bcc).
Note that because registers BX, CX,
and DX are not used, 0 is passed for those
parameters. Try this out in kernel's main to see how it
works. Don’t forget an infinite loop at the end of main!
Now that you know a bit about interrupt 0x10 and how
to invoke interrupts from C, add a printString function
to your kernel.c file. This function takes a pointer to
a C string as a parameter, prints the contents of the string, and
returns the number of characters that were printed. Your function
should have the prototype:
int printString(char *str);
Your function should print out each character of the string using the interrupt function until it reaches the null terminator (0x00) at which point it should stop. The null terminator should not be printed.
You should test your function by placing a call
to printString in the main function of your
kernel. For example:
printString("Hello World");
This statement should display the string "Hello World" immediately following the output produced by bochs during boot.
Note that to test whether your printString function is
returning the correct value, you could use a for loop to print out ‘*’
characters. For example, if printString returned 7 then
your loop should print *******.
Reading from the Keyboard via the BIOS (Interrupt 0x16)
The BIOS interrupt for reading a character from the keyboard
is 0x16. Like interrupt 0x10, when
interrupt 0x16 is generated, the value in AH
determines what is to be done. If AH
equals 0x00, then the interrupt will return the ASCII
code of the next key that is pressed.
Add a readChar function to your kernel with the prototype:
int readChar();
Your readChar function should call
interrupt 0x16 and return the result. The result
returned from interrupt 0x16 has two parts:
- The low-order byte contains the ASCII code for the character typed.
- The high-order byte contains what is called the scan code.
The scan code allows you to process things like function keys,
arrow keys and whether the command key was pressed in combination with
another key. You can test your readChar function by
adding code similar to the following to your kernel's main:
char *buf = "*****";
char ch;
int fullCh;
int scanCode;
// just read the character.
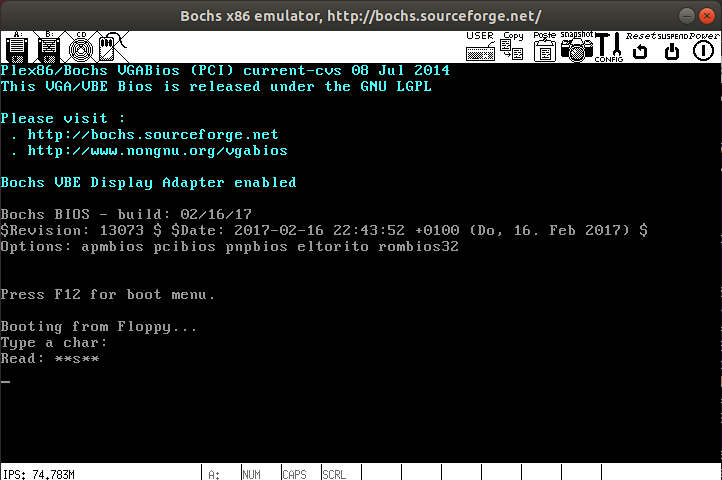
printString("Type a char: ");
ch = readChar();
buf[2] = ch; // this is okay with bcc but not gcc
printString("\n\rRead: ");
printString(buf);
printString("\n\r");
Before moving on, check your understanding:
- Why did we have to do all this seemingly "extra" work after
calling
readChar? Why can't we just printch? - If
readCharreturns an int, why are we setting it to a char? What impact does that have?
Add a readString function to your kernel with the
prototype:
int readString(char *buf);
readString should read characters into the character
array buf until the ENTER key is pressed
(ASCII 0x0D or '\r'). The ASCII code for
the ENTER key (0x0D) should not appear in the character array. Your
readString function should finish by adding a null terminator (ASCII
0x00 or '\0') to the end of buf
and returning the number of characters that were placed in the buffer
(excluding the null terminator). Your readString
function should also echo each character to the screen as it is typed
so that the user can see what is being typed.
You can test your function by invoking readString in
your main function. For example:
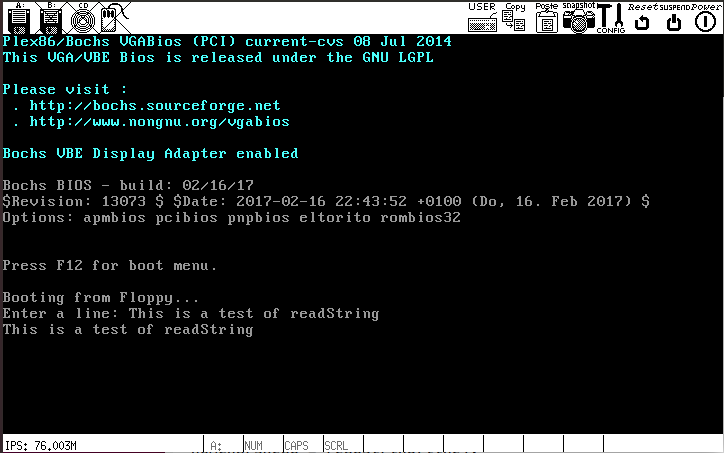
char line[20];
printString("Enter a line: ");
readString(line);
printString("\n\r");
printString(line);
When you run this in bochs, it should prompt you to enter a line. When you press ENTER, it should echo what you typed back to you on the next line.
How can you test that your function returns the correct number?
Note that, unless you were particularly careful when you
wrote readString, using the delete (backspace) key will
not work as expected. Also, you might occasionally see strange
behavior from your kernel if you enter more characters than are in the
char array. The backspace key issue will be fixed as a Kernel
Enhancement below. The issue with reading too many characters is
fixed as a Bonus feature.
Reading a Sector from Disk via the BIOS (Interrupt 0x13)
BIOS interrupt 0x13 can be used to read or write
sectors from a disk. Interrupt 0x13 expects the
registers to contain the following information:
-
AH: indicates read/write. Use0x02for read. -
AL: indicates the number of sectors to read. Use0x01to read one sector. -
BX: address of the buffer where the data from the sector is to be stored -
CH: track number of the sector -
CL: relative sector number within the track -
DH: head number to read -
DL: indicates which disk to read. Use0x00to read from the first floppy disk.
Add a readSector function to your kernel with the
prototype:
int readSector(char *buf, int absSector);
- The parameter
bufindicates the address of the buffer into which the data in the sector should be placed. - The parameter
absSectorindicates the absolute sector number of the disk to be read.
Unfortunately, interrupt 0x13 requires a track
(i.e. cylinder), head, relative sector address rather than an absolute
sector number. Fortunately, there is a fairly straightforward
conversion:
For a 3.5” floppy disk:
relSector = ( absSector MOD 18 ) + 1
head = ( absSector / 18 ) MOD 2
track = ( absSector / 36 )
Although this mapping is fairly straightforward there is one
complication, the bcc compiler does not support a MOD
(i.e., % or remainder) operator. Thus, you will have to write your
own mod function. Finally, the readSector function
should always return 1, indicating that one sector has been
transferred.
To test your readSector function, you will first need
to place some data in a sector on the disk that you can then read
and display. If you have not yet done so, add a line to the
Makefile that uses the dd command to place the provided message.txt
file into sector 30 of the disk after copying in the kernel:
dd if=message.txt of=floppya.img bs=512 conv=notrunc
seek=30
You can then add code to the main function of your kernel to test
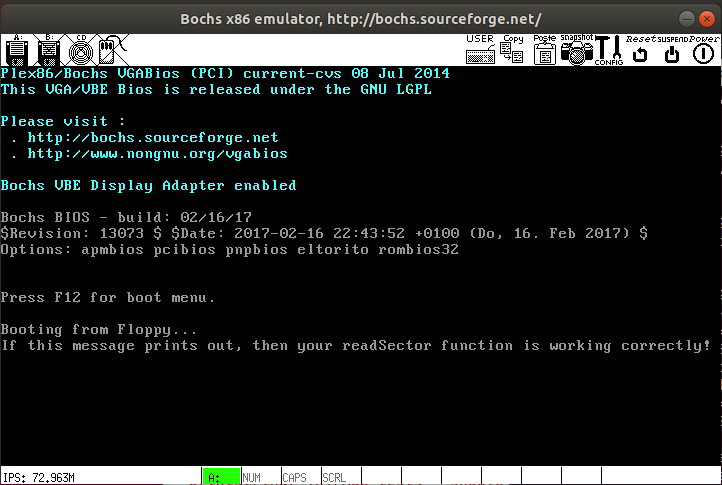
your readSector function. For example:
char buffer[512];
readSector(buffer, 30);
printString(buffer);
If the contents of the message.txt file prints out
when you run bochs, then your readSector function is
working.
Commit and push your code to GitHub if you haven't already. This is the last time I'll remind you (just in case you think that if I don't say anything, that means you shouldn't). Hopefully, you'll be in the rhythm from here on.
Step 2: Creating the System Call Interface
The functions that you wrote can be invoked from the main function in the kernel. However, they cannot be invoked from anywhere else. In particular, user-written programs will not be able to invoke them. To make it possible for user-written programs to invoke these functions (via the kernel), you need to create a system call interface to them.
Your system call interface will be based on creating
an Interrupt Service Routine (ISR) for
interrupt 0x21, which is a user-defined interrupt that is
typically used to provide OS-specific services. To create an ISR for
interrupt 0x21, place the address of the ISR into
entry 0x21 of the machine’s interrupt vector. Once that has
been done, any time an interrupt 0x21 happens, your ISR
will be executed.
The interrupt vector table sits at the absolute
bottom of memory and contains a 4-byte address for each interrupt
number. Thus, to add an ISR for interrupt 0x21, you will write the
function that you want to be called each time there is an interrupt
0x21, and then put the address of that function
into memory at address
0x00084 (0x21*4).
Unfortunately, setting up the interrupt vector and the initial part
of an ISR really must be done in assembly code. Two assembly
routines, makeInterrupt21 and interrupt21ServiceRoutine, have
been added to the kernel.asm file for this purpose. The
makeInterrupt21 routine places the address of the
interrupt21ServiceRoutine into entry 0x21 of the
interrupt vector. Thus, after makeInterrupt21 is executed, the
interrupt21ServiceRoutine will be invoked every time an
interrupt 0x21 occurs. When invoked, the
interrupt21ServiceRoutine simply calls a function named
handleInterrupt21 that you will define in your
kernel. The net effect is that the handleInterrupt21
function that you define in your kernel will be invoked each time an
interrupt 0x21 occurs.
To setup the ISR for interrupt 0x21 you need to complete several steps:
- In the
kernel.asmfile, uncomment the following line by removing the;at the start of the line:; .extern _handleInterrupt21
- In the
kernel.asmfile, uncomment all of the lines below the following line:_interrupt21ServiceRoutine:
- In your kernel define the
handleInterrupt21function with the following prototype:int
handleInterrupt21(int ax, int bx, int cx, int dx);For now, your
handleInterrupt21function should simply use yourprintStringto print a message to the screen (e.g., "Quit Interrupting!") and return the value 0. - Add the lines below to your kernel’s
mainfunction to setup the ISR for interrupt0x21and to generate an interrupt0x21.makeInterrupt21(); interrupt(0x21,0x00,0,0,0);
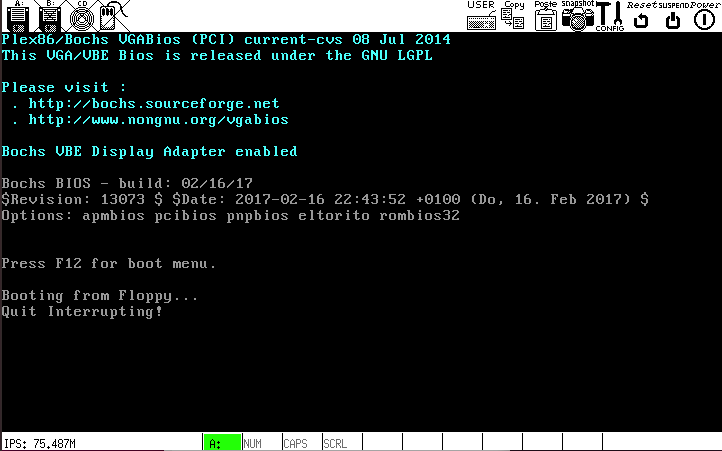
If you’ve done everything correctly, when you compile your kernel
and boot bochs it will display the message that you printed out in
your handleInterrupt21 function.
Creating printString, readChar, and readString System Calls
Now it is time to make your interrupt 0x21 ISR
provide printString, readChar,
and readString services. When you defined
your handleInterrupt21 function, it had parameters
for ax, bx, cx
and dx. The values of these parameters will be the
values of the corresponding arguments provided when the interrupt
function is invoked. The value of ax will be used to
indicate which service is being requested,
and bx, cx and dx are
available to be used as parameters for that service (e.g., the
address of a string to print, a buffer to fill or the number of the
sector to read).
Modify your handleInterrupt21 function so that it
provides the following services:
	printString:	print a null terminated string at the current cursor location.
		AX: 		0x00
		BX: 		The address of the string to be printed.
		CX: 		Unused
		DX: 		Unused
		Return:	The number of characters that were printed.

	readChar: read a character from the keyboard.
		AX: 		0x11
		BX:		The address of the buffer into which to place the character
                                read from the keyboard.
		CX:		Unused
		DX:		Unused
		Return:	1

	readString: read characters from the keyboard until ENTER is pressed.
		AX: 		0x01
		BX:		The address of the buffer into which to place the characters
                                read from the keyboard.
		CX:		Unused
		DX:		Unused
		Return:	The number of characters that were placed into the buffer.
		        (Excluding the null terminator).
If the value passed in AX does not match one of the
provided services, your handleInterrupt21 function should
return the value -1.
For readChar, it may be helpful to draw a picture of
what you have and what you need.
Note that we did not create a system call for
the readSector function. In general, we do not want
users to be able to read individual sectors from the disk. Instead we
will want to force them to use the file system that we create to read
information on the disk. By not exposing readSector as a system call,
it will only be able to be used by the OS kernel.
To test your system calls, you can invoke them from
the main function in your kernel as shown below.
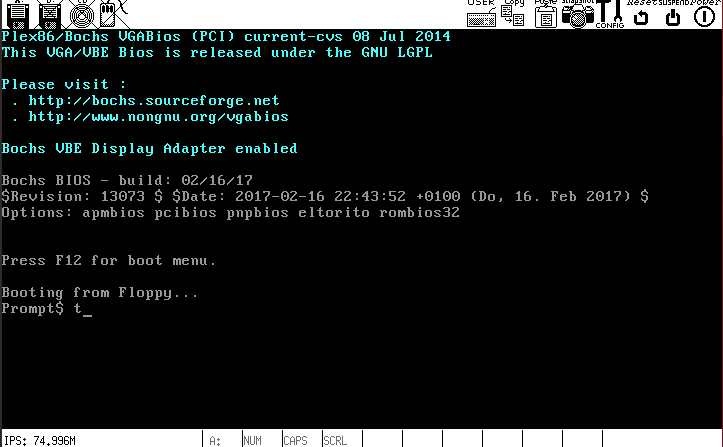
	char line[80];
	char ch[1];
	makeInterrupt21();	// setup ISR for interrupt 0x21


	interrupt(0x21, 0x00, "Prompt$ ", 0, 0);	// display prompt
	interrupt(0x21, 0x11, ch, 0, 0);	// read char
	line[0] = ch[0];
	line[1] = 0x00;
	interrupt(0x21, 0x00, line, 0, 0);	// print string
Finally, test that readString works.
Using the interrupts here is just a way to test that your system
call interface is working. Your kernel would be better off
calling printString and readChar directly.
Ultimately, these system calls will be used in user programs rather
than by your kernel, but that will have to wait until the next
project!
Step 3: Kernel Improvements
Modify your readString function so that the
BACKSPACE/DELETE key is handled correctly. When the BACKSPACE key is
pressed (ASCII 0x08) the last character typed should be
erased from the screen and removed from the buffer. The ASCII
character 0x08 should not be placed in the buffer. If
BACKSPACE is pressed several times in succession additional characters
should be erased from the screen and removed from the buffer.
Note: Printing the ASCII value 0x08 will move the
cursor back one space but it will not erase the character from the
screen and it will not remove the character from your buffer, you will
have to program those things in. Modify your main to test
this functionality.
Finalizing Your Kernel
Your final kernel should, at a minimum, demonstrate calling interrupts (and therefore the system calls and BIOS routines) to
- read a character
- read a string (allowing me to test your handling of backspace)
- print a string
Finally, demonstrate that the call to readSector works.
Bonus
- The
readStringsystem call, as defined above, contains a significant security hole. To use thereadStringsystem call, you first allocate a buffer of some size and then make the system call. The OS then begins reading characters from the keyboard and placing them into the buffer that was allocated. Because the OS has no way to know the size of the allocated buffer, it is possible that the user will enter more characters than will fit into the allocated space. If you wrote yourreadStringfunction in a typical way, this means that characters will continue to be placed into memory beyond the allocated buffer. For example, ifbufhas room for 10 characters thenbuf[9]is the last allocated space in the buffer. When the user enters the 11th character it will be placed intobuf[10], overwriting whatever happened to be in that space. A clever user can continue to enter characters until they begin to overwrite other data belonging to the program. A very, very clever user will overwrite that data in such a way that they can gain control of the program’s execution. This type of attack is called a Buffer Overflow or Buffer Overrun attack.The best way to prevent Buffer Overrun attacks is to ensure that the OS will never allow more characters to be read than have been allocated for the buffer. It turns out this is quite difficult and requires significant overhead. A good alternative is to allow the program that is requesting input to specify a maximum number of characters to be read into the buffer.
Modify your
readStringsystem call so that the calling program can specify the maximum number of characters that will be placed into the provided buffer. The system call should still return only after the user presses the ENTER/RETURN key and should continue to behave in a sensible way when additional keystrokes are types and also in response to the BACKSPACE/DELETE key. You must include a comment describing the behavior of your newreadStringso that I can test that it behaves in the intended manner. - Create a
printIntfunction in your kernel. This function should accept an integer argument and print its decimal value to the screen. You will find this function to be very helpful in debugging your kernel. You should not create a system call for this function.
Submission
GitHub Classroom will make a snapshot of your repository at the deadline. It can only see the code that you pushed to the repository. Your final repository should include your source code (namely, kernel.c and kernel.asm) and the updated Makefile. You should not add any of the generated files.
I should be able to pull your code, run make clean and build.sh
and then run.sh to see your kernel running.
Assessment
You will be assessed based on:
- (85) Kernel Functionality
- Makefile
- printString
- readChar
- readString
- readSector
- System call interface
- (5) Kernel improvements
- (10) Code style: proper comments/documentation, format
Acknowledgement
This assignment as well as the accompanying files and source code have been adopted with minor adaptations from those developed by Michael Black at American University. His paper "Build an operating system from scratch: a project for an introductory operating systems course" can be found in the ACM Digital Library.