Project 3: Loading & Executing Programs + Shell
Due: Friday, November 2, 11:59:59 p.m.
Recommendation: Complete at least through Step 3 by
Friday, October 26. Step 3 is quite tricky.
Table of Contents:
Objective
In this project, you will write routines to read files into memory and execute programs. You will then write a basic shell program that will be able to execute other programs and print out ASCII text files. In addition you will create a user library file that provides wrappers around system calls, simplifying the creation of user programs.
Background
Before we can have our OS load and execute programs, we need to define a file system. The main purpose of a file system is to keep track of the files stored on disk.
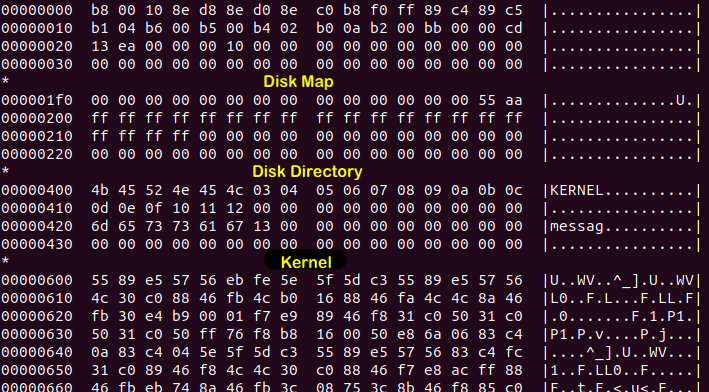
To track files, it keeps a list of the names of all of the files on the disk and for each file a list of the sectors that make the file. The file system also keeps track of which sectors on the disk are used and which are unused. Two sectors at the beginning of the disk are used to store the information needed by the file system for these purposes. The Disk Map is stored in sector 1, and the Disk Directory is stored in sector 2. (This is the reason that you stored your kernel starting at sector 3.)
The Disk Map keeps track of which sectors are free and which
sectors are allocated to files. Each sector on the disk is represented
by one byte in the Disk Map. A byte entry of 0x00 means
that the sector is free and a byte entry of 0xFF means
that the sector is used. The file system will examine the Disk Map to
find free sectors when new files are created or existing files grow in
size. The file system will also modify the Disk Map when a free
sector is allocated to a file or when a file is deleted. Since you
are only reading files in this project, you will not need to read or
modify the Disk Map in this project.
The Disk Directory lists the name of each file and the sectors that
are allocated to it. The Disk Directory for our OS has 16 directory
entries and each entry contains 32 bytes (Note: 16 entries X 32
bytes/entry = 512 bytes = 1 sector). The first six bytes of each
directory entry is the file name. The remaining 26 bytes are sector
numbers indicating which sectors make up the file. If the first byte
of a directory entry (i.e., the first character of its filename) is
0x00, then there is no file at that entry.
For example, a directory entry of:
4B 45 52 4E 45 4C 03 04 05 06 00 00 00 00 00 00 00 00...
K  E  R  N  E  L
represents a file, with the name “KERNEL” that is located in sectors 3, 4, 5, 6.
If a file name is less than 6 bytes, the remainder of the 6 bytes
should be padded out with 0x00s. Similarly, if a file
uses less than 26 sectors the remaining bytes should be padded out
with 0x00s.
This file system is quite small. Since each byte in the Disk Map represents one sector, there can be a maximum of 512 sectors used on the disk. However, because the Disk Directory entries use one byte for each sector, we will not be able to use any sector beyond 256. Additionally, since a file can have no more than 26 sectors, the maximum size of a file is 13kB. While this is more than adequate for this project and for learning about file systems, it would be grossly inadequate for a modern operating system!
Getting Started
Go to the GitHub Assignment to set up your repository.
Start your VM, open a terminal, and clone your GitHub repository
When finished, you should have a directory
named project3_username containing the files:
bootload.asm– assembly code for the boot loader.dir.img– a Disk Directory image containing the kernelkernel.asm– assembly language routines you will use in your kernel.lib.asm– assembly language routine for invoking from user program interrupts (i.e., making system calls)loadfile.c- a utility program that will copy files to the floppy disk and update the Disk Directory and Disk Map appropriatelymap.img- a Disk Map with the kernel sectors marked as usedmessage.txt– a small text file used to test your read sector system call.opsys.bxrc– bochs configuration file.kernel.c– a kernel for project 2 (can be replaced with your code)userlib.h- the prototype for the user libraryrun.sh,build.sh(which just calls make), andMakefile– scripts to compile, link, image, and run your OS.
You can either use the kernel.c that I provide, OR
(preferred in terms of ownership of your OS) you can copy
your kernel.c file from project2 into the project3
directory. You can compare with my kernel.c to see if your code is
correct.
Step 1: Adding File System Information to the Disk
Two of the new files for this project are map.img
and dir.img. These contain a Disk Map and a Disk
Directory for a file system containing only the kernel in sectors
3-18. You should verify your understanding of the file system by
examining the contents of the dir.img
and map.img files using
hexdump -C.
Our file system will store the Disk Map in sector 1 of the disk and
the Disk Directory in sector 2. To setup the initial file system,
verify that the following lines are in your Makefile
after the empty disk image is created:
dd if=map.img of=floppya.img bs=512 count=1 seek=1 conv=notrunc
dd if=dir.img of=floppya.img bs=512 count=1 seek=2 conv=notrunc
After you have added the Disk Map and Disk Directory to the disk
image, you should read the disk image using hexdump -C and
verify that they are in the correct location. Recall that you can
pipe the output through more so that you can see the
output page by page.
Adding a Test File on the Disk
You will be creating system calls for reading files from the disk.
However, you will not create the system calls for writing files until
the next project. So that you have some files to read, you are
provided with the loadfile.c utility program. This
program will read a file and write it to floppya.img.
The loadfile utility looks at the Disk Map to find empty
sectors for the file, copies the file to those sectors and then
modifies the Disk Map and Disk Directory appropriately.
The loadfile.c utility runs under the local
OS so it can be compiled with gcc using the command:
gcc -o loadfile loadfile.c
Update your Makefile so that you can run make loadfile to compile the file and generate the executable.
After loadfile has been compiled, you can use it to
copy the contents of the message.txt file to your disk
image using the command:
./loadfile message.txt
Update your Makefile to add message.txt to the disk
image, and remove the hard-coded addition of message.txt
to sector 30.
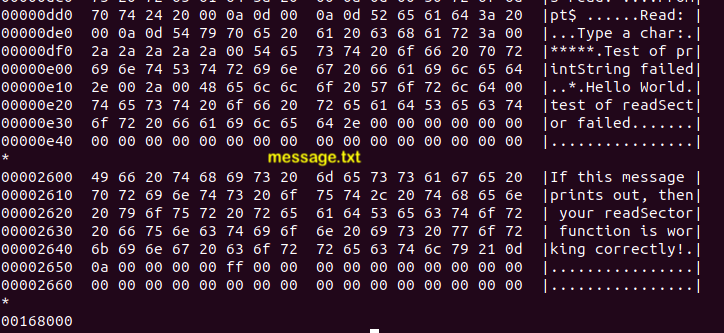
After you have copied the message.txt file to your
disk image, open the disk image with hexdump -C and
verify that the Disk Directory now contains an entry
for message.txt. Note however that "message.txt" is more
than six letters so loadfile will have truncated the name
to six letters and thus the file name in the Disk Directory will
be messag. You should also use hexdump on
your floppy disk image to verify that the sector allocated for the
messag file has been marked as used in the Disk Map and that the
contents of message.txt appear in the sector allocated to
the messag file.
 Examples of using
 hexdump
on floppya.img
Step 2: Creating a User Program
The next addition to your kernel will be to load and execute a user
program. You’ll first create a user program and load it onto the disk
image. User programs will be written in C and compiled
with bcc. They will request services from the OS by
making system calls with the interrupt function defined
in the lib.asm file. The interrupt function
in lib.asm is identical to the one you have been using
from kernel.asm so you already know how to invoke it.
Create a new source file named uprog1.c containing the
following program:
void main() {
	interrupt(0x21,0,"WooHoo! I'm a user program!\r\n",0,0);
	while(1); // TODO: change to terminate later
}
Add appropriate comments at the top.
The following commands assemble the lib.asm file,
compile the uprog1.c user program, link the two object
files and place the resulting executable file on the disk:
	as86 lib.asm -o lib.o
	bcc -ansi -c -o uprog1.o uprog1.c
	ld86 -o uprog1 -d uprog1.o lib.o
	./loadfile uprog1
Use hexdump -C to verify that the uprog1
executable file has been added to the Disk Directory. Again, recall
that you can pipe the output through more to see the dump
page by page.
After making sure the commands above work, add them to
your Makefile,
as appropriate. Think about what your target should be and which
commands go with which targets. Run make clean to get
rid of floppya.img and then run build.sh to
make sure that you created floppya.img correctly and then
run it. You can check floppya.img
with hexdump again.
Update the rule for clean in your Makefile so that
uprog1 is also deleted on a clean.
Git Interlude
Since students have been having problems with adding files into
the repository that they shouldn't (e.g., executables, disk image,
...), I added a .gitignore file, which
tells git which files should not be added to the
repo. Since you're creating a bunch of new code (and the
associated executables), you may want to
update .gitignore so that the executables are not
added to the repo.
Get in the habit of commiting/pushing your code at least after every step.
Step 3: Loading and Printing a File
Create a new function named readFile in your kernel
with the prototype:
int readFile(char *filename, char *buf);
- The
filenameparameter will be a null terminated string indicating the name of the file to be read - The
bufparameter indicates the buffer where the contents of the file are to be placed.
Your readFile function will read in the Disk Directory
from sector 2 and search it for the indicated filename. If you find
the filename in the Disk Directory, then read each sector of the file
and store it into the buffer indicated by buf,
sequentially. The function should return the number of sectors read.
If the filename is not found in the Disk Directory,
then readFile should return -1.
Recommendation: Write your algorithm in pseudocode to start. It is helpful to create functions that implement parts of this function so that you can test them individually and call those functions when they're ready.
System Call for Reading a File
Add a system call for reading a file by modifying your
handleInterrupt21 function so that it provides the
following service:
	readFile:	read the contents of a file into a buffer.
		AX: 		0x03
		BX: 		The address of the name of the file to be read.
		CX: 		The address of the buffer into which to place the file contents.
		DX: 		Unused
		Return:	The number of sectors that were read or -1 if the file was not found.
Adding the following code to your main function will
provide a partial test for your new system call and
your readFile function:
   char buffer[13312];	/* the maximum size of a file*/
   makeInterrupt21();

   /* read the file into buffer */
   interrupt(0x21, 0x03, "messag", buffer, 0);

   /* print out the file */
   interrupt(0x21, 0x00, buffer, 0, 0);

   while(1);			/* infinite loop */
Running your kernel with this code should display the contents of message.txt:
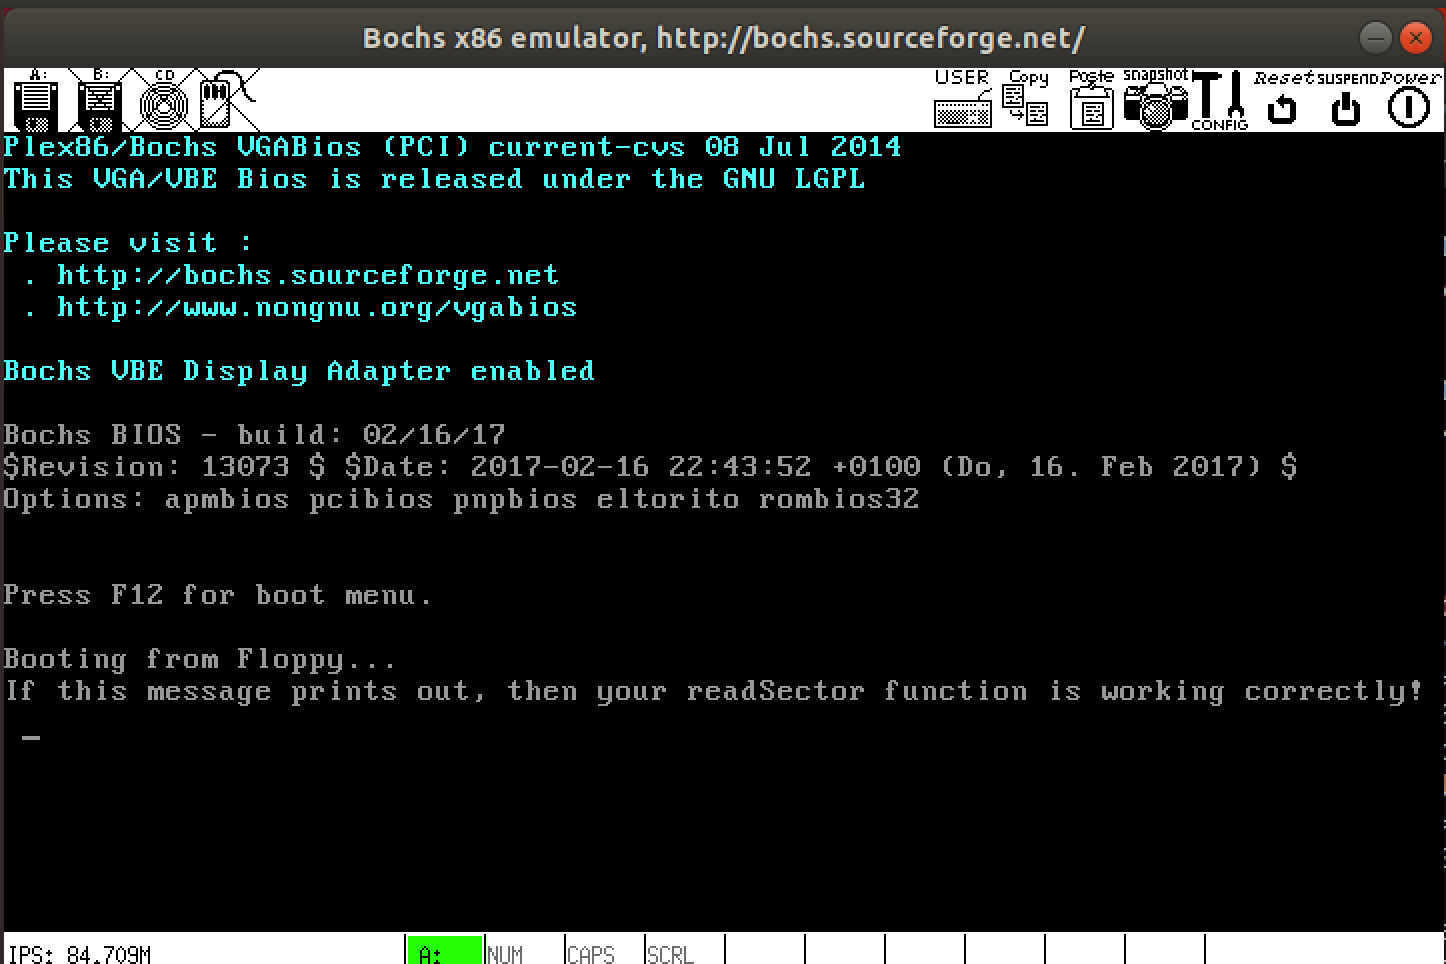
readFileWhy did I say partially test? What other things should you test?
Step 4. Loading and Executing a Program
Now that you know how to create user programs and add them to your disk image, it is time to add functionality to the kernel to load and execute them. Loading and executing a user program consists of four steps:
- Load the program from disk into a buffer.
- Transfer the program from the buffer into the bottom of the memory segment where you want it to run.
- Set the segment registers
(
ds,ss,es) to the segment containing the program and set the stack pointer (sp,bp) to the program's stack. - Jump to the start of the program.
Create a new function named executeProgram in your
kernel with the prototype:
int executeProgram(char* name, int segment);
The name parameter is the name of the program you want
to run, and segment is the memory segment where you want it to run.
The segment should be a multiple of 0x1000. Note that a
segment of 0x1000 means a base memory location
of 0x10000 to which offsets will be added.
0x0000 should not be used because loading a program there
will overwrite the interrupt vector. 0x1000 also should
not be used because the bootloader loaded your kernel
at 0x07c00, which is in segment 0x1000, and
you do not want to overwrite it. Segments 0xA000 and
above also cannot be used because memory addresses
above 0xA0000 is reserved for the video ram, memory
mapped I/O devices and the BIOS. (Note: 0xA0000 =
655360, which is beyond the 640kb of RAM that is available in
16-bit real mode. Your function should ensure that the segment being
used is valid.
Your executeProgram function should use
your readFile function to load the executable file from
disk into a buffer. It will then use the putInMemory
function from the kernel.asm file to transfer the
executable program from the buffer into the memory segment where it
will be executed. Place the first instruction of the program at the
bottom (i.e., offset 0x0000) of the segment. Refer
to project 1 if you do not recall how to
use the putInMemory function.
Once your program is loaded into the segment where it will be
executed, set the segment and stack registers appropriately. Because
this must be done in assembly language, the kernel.asm
file contains a function named launchProgram with the
prototype:
void launchProgram(int segment);
When called, this function sets all of the segment registers to the
indicated segment and sets the stack pointer to
offset 0xFFF0 within the segment. It then jumps to the
instruction located at offset 0x0000 within the segment.
If you’ve done everything correctly, the instruction at that location
will be the first instruction in the user program and it will begin
executing. Because launchProgram transfers control of
the computer to the user program, your call
to launchProgram will never return.
Error handling. If the program isn't found, return -1. If the segment is invalid, return -2.
System Call
You should also add a system call for loading and executing a
program by modifying your handleInterrupt21 function so
that it provides the following service:
	executeProgram:	load the program into memory and execute it.
		AX: 		0x04
		BX: 		The name of the program to execute.
		CX: 		The segment into which the program should be loaded.
		DX: 		Unused
		Return:	-1 if the program was not found.
	        -2 if the segment is not valid.
	        Note: If the program is found, this system call will never return.
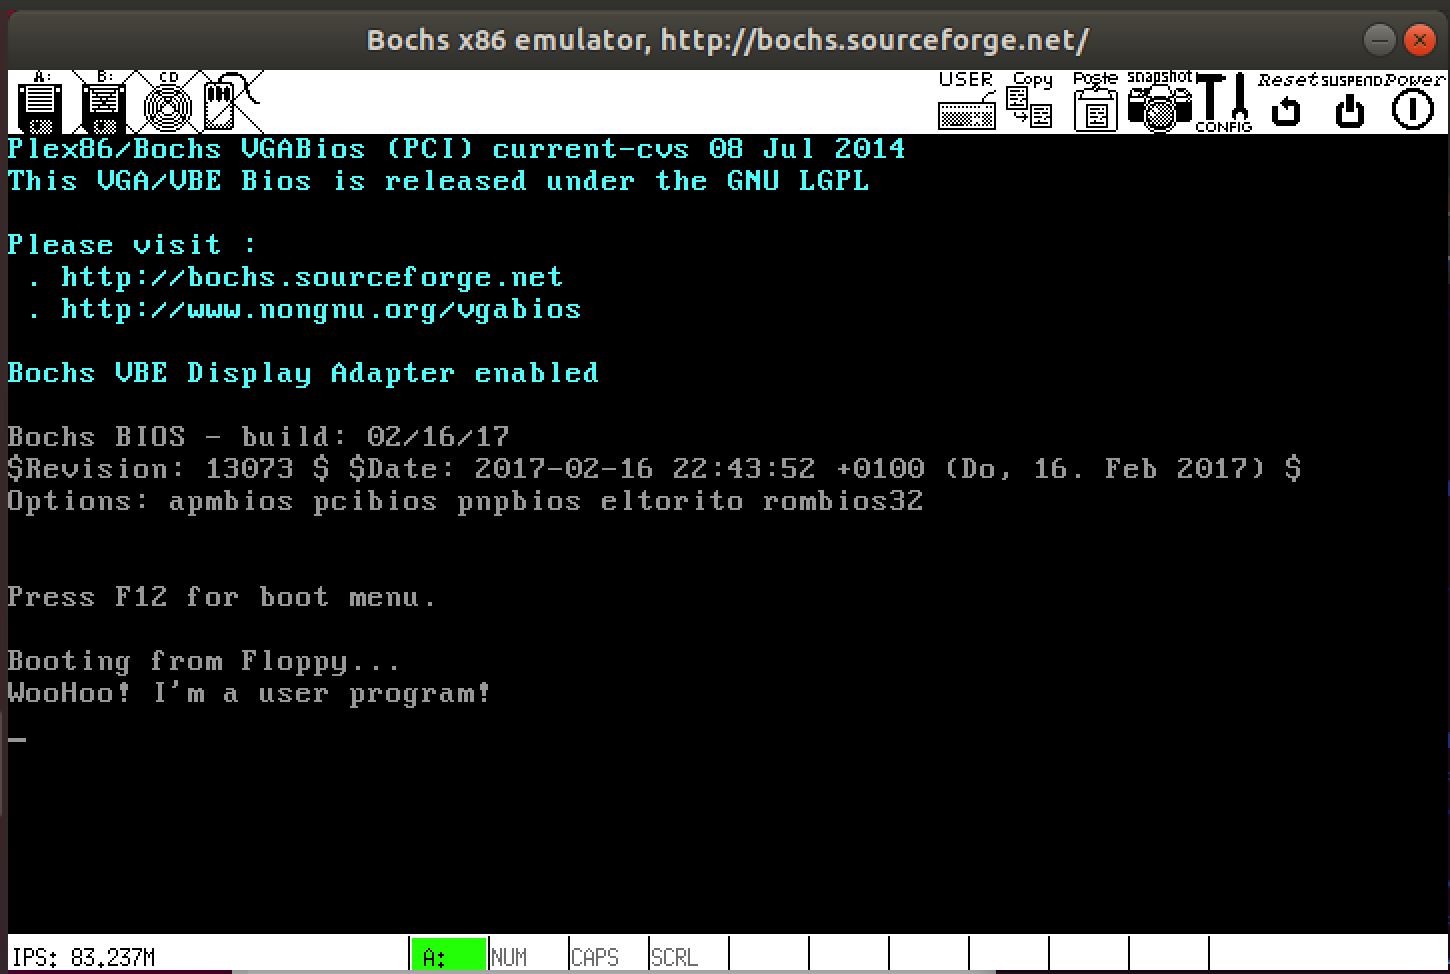
Adding the following code to your main function will load the
uprog1 program from the disk image into
segment 0x2000 and execute it. Alternatively, to
keep main neat, create a test function (similar to what
was in the original kernel.c from GitHub) and call that function.
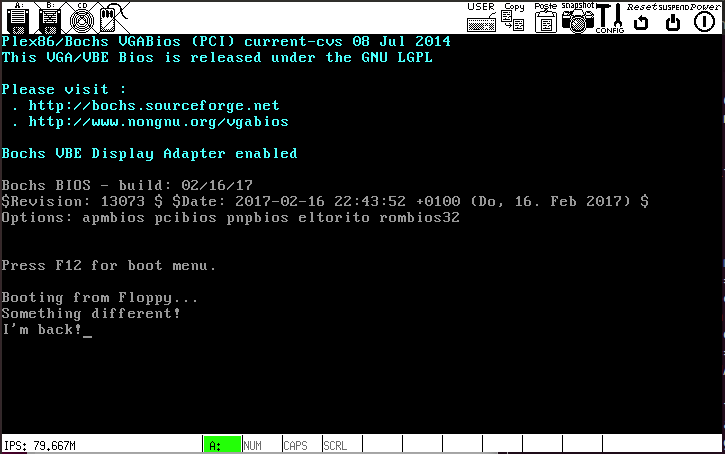
makeInterrupt21();
interrupt(0x21, 0x04, "uprog1", 0x2000, 0);
interrupt(0x21, 0x00, "Done!\n\r", 0, 0);
while(1);
Now booting your kernel will result in the execution of the user
program uprog1. If your executeProgram
system call (interrupt 0x21, AX=0x04) works correctly
control will never return to the kernel and thus "Done!" will not be
printed. Instead the uprog1 program will display
"WooHoo! I'm a user program!" and then enter its infinite loop.
executeProgramStep 5. Make a System Library for User Programs
Your user program calls the interrupt function to generate system
calls that request OS services (e.g., printing, reading files etc...).
This makes user programs difficult to read and inconvenient to write.
In real systems, software libraries are created that have easy to use
functions that serve as wrappers around the system calls. This makes
user programs easier to read and write
(e.g., print("ABC") instead of interrupt(0x21,
0x00, "ABC", 0, 0)) because the programmer doesn’t have to
remember the interrupt numbers or parameters.
Create a user program library that provides functions that access
all of the OS services provided by your kernel. The prototypes for
your library functions should be written in a file
named userlib.h and the implementations of the functions
should be in a file named userlib.c. Many of the
functions will simply be one line of code that call an interrupt
defined by handleInterrupt21.
execute should load the program into
segment 0x2000. In project 5, we'll implement a
memory management policy.
The GitHub repository included a suggested
final userlib.h file for you. Use this to guide your
implementation, uncommenting functions, one by one.
Update your Makefile to compile userlib.c
to userlib.o
Applying the User Library
Modify your uprog1.c program so that it includes the
user program library and calls its print function instead
of invoking the interrupt function directly. Modify
your Makefile so that it links userlib.o
with your user program. You should not use interrupts in the remaining
user programs or shell.
Step 6. Terminating a User Program
The user program that you created and executed above took control of the machine and never returned. An improvement would be to provide a mechanism by which a user program can return control to the operating system when it is complete (i.e., a system call for terminating the program).
Create a new function named terminate in your kernel with the
prototype:
void terminate();
For now, this function should do three things (we’ll modify it later):
- Reset the segment registers and the stack pointer to the
memory segment containing the kernel (
0x1000). This must be done in assembly language, so thekernel.asmfile provides a function with the prototype:void resetSegments();
When invoked, this function resets the segment registers and stack registers to the kernel segment. - Print a message (e.g., "I'm back!")
- Enter an infinite loop.
You should also add a system call that a user program can use to
terminate itself by modifying your handleInterrupt21
function so that it provides the following service:
	terminate:	terminate a user program.
		AX: 		0x05
		BX: 		Unused
		CX: 		Unused
		DX: 		Unused
		Return:	This system call will never return. After all, the program
				has been terminated, where would it return to?
Add the terminate wrapper call to your userlib.c
and userlib.h file.
Now create a new user program, uprog2.c, that prints a
message and then makes a terminate system call.
Your uprog2 program should print something different than
your uprog1 program so that you can be sure the correct
one is executing. Modify your main function to load and
execute uprog2 instead of uprog1. Now when
you boot, uprog2 should display its message and then
terminate. The kernel should then display "I'm Back!" and
enter the infinite loop in the terminate function.
Add commands to your Makefile so uprog2
is built and added to the disk image. Also, update
your Makefile so that clean will delete the
executable. (Remember to do this whenever you create a new executable.)
Once you have confirmed that uprog2 works correctly,
replace the infinite loop in uprog1.c with a call to
terminate as well.
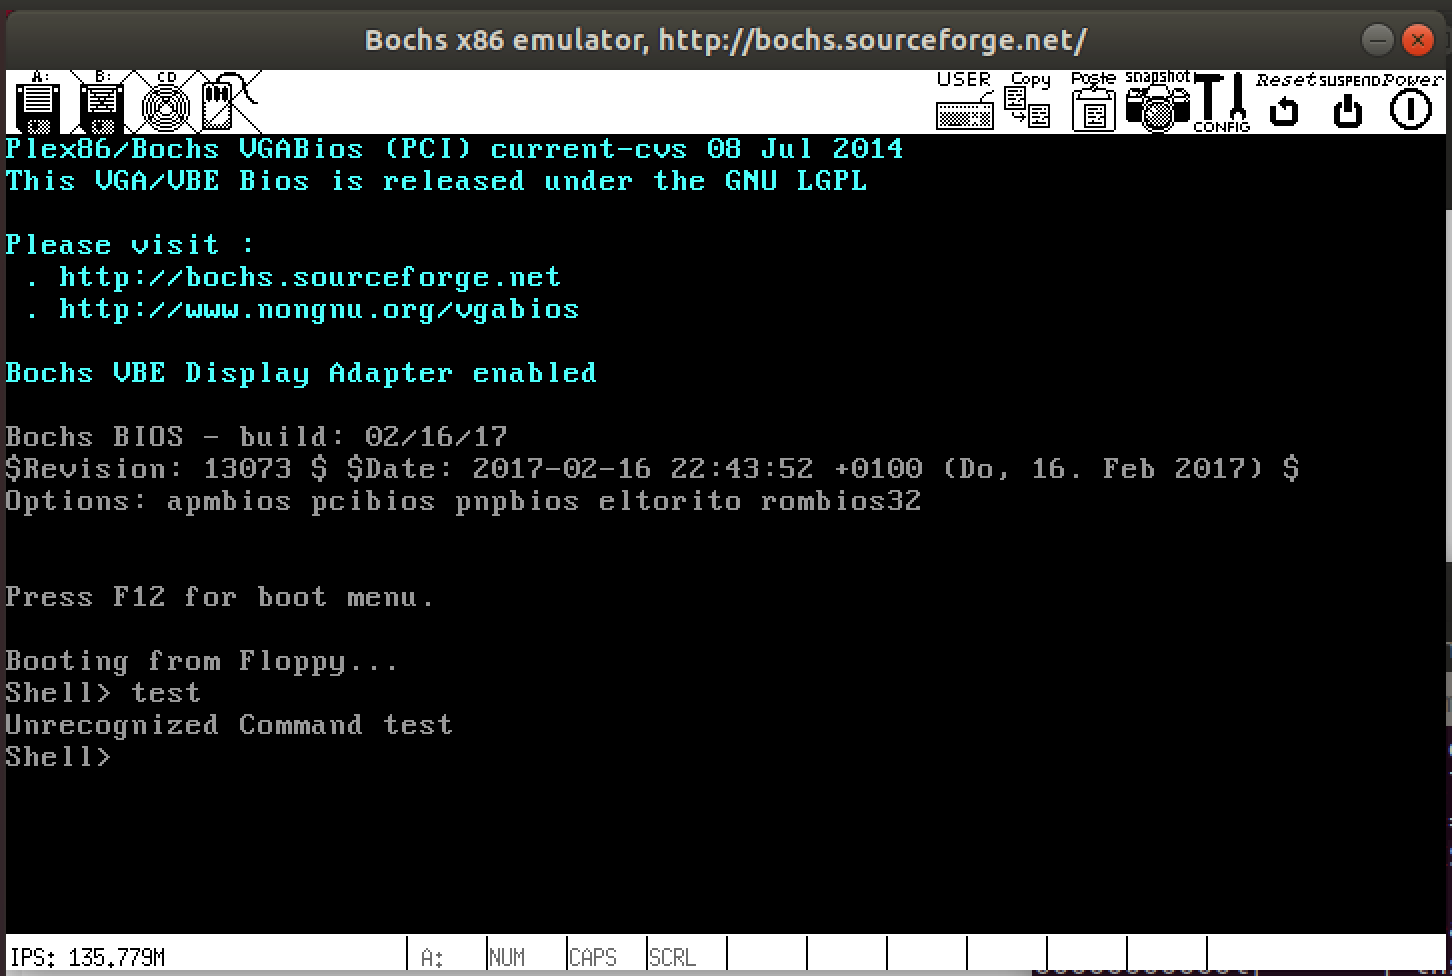
Step 7. Command Line Shell
Note: If there are any flaws in the implementation of your previous steps or project 2, it’s possible they may surface and cause odd errors in this step. Don’t forget to check your assumptions and don’t be afraid to verify code that you previously thought was working!
In its most basic form, a command line shell (think bash or DOS) is just a user program that reads keyboard input from the user and makes appropriate system calls based upon what the user types.
Create a new file named shell.c to contain the source
code for your command line shell. As a start, have your shell
implement the following functionality (or lack thereof):
	while (true) {
		print a command prompt (e.g., "Shell> ")
		read a line of input from the user
		print "Unrecognized command."
	}
As you develop your shell, you should not reimplement any of the services that are provided by the OS kernel (e.g., printing, reading input, reading files, etc...). Instead you should use system calls to request that the OS perform those services for you.
Once you have written the code for your shell, add commands to your
Makefile to compile your shell.c program,
link it with lib.asm, and place it in the disk image.
Also, modify the main function in your kernel so that it
loads and executes your shell. Now when you boot the computer, your
shell should run and prompt you for a command. Of course, at this
point, it will defy your every command by responding with
"Unrecognized command." You’ll fix that momentarily.
Setup of initial shell
Implementing the type command
Shell Command: type <file>
Modify your shell so that it recognizes the command: type
<file>. This command should display the contents of
<file> on the screen. For example, if the user
enters the command: type messag then the contents of the
messag file should be displayed.
If <file> does not exist on the disk the shell
should print an error message.
userlib.h suggests that you create
an areStringsEqual function, to help you match the commands.
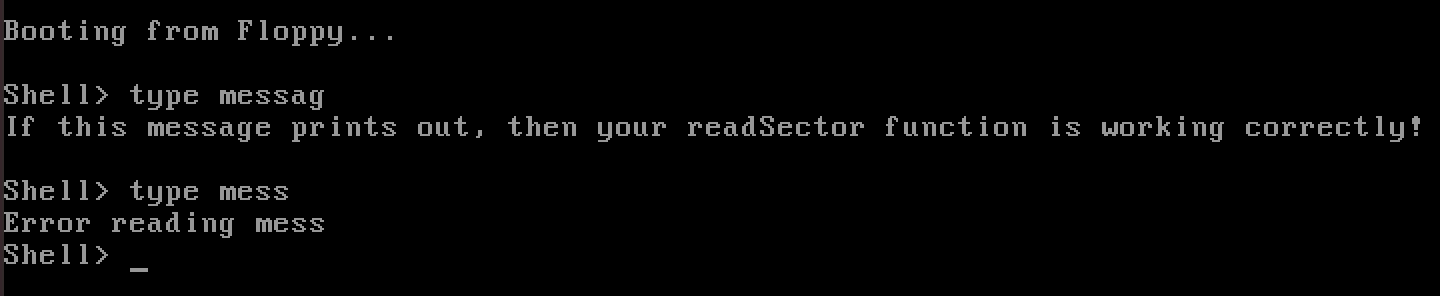
Sample screenshot for type
Implementing the execute command
Shell Command: execute <file>
Extend your shell so that it also recognizes the command:
execute <file>. This command should load
<file> into memory and execute it. For example, if
the user enters the command: execute uprog2 then
the uprog2 program should be executed.
If <file> does not exist on the disk, the shell
should print an error message.
The shell should ask the OS to load the program into
segment 0x2000
(via userlib's execute function), replacing
the shell (kind of like a fork followed by
an execv in Unix).
Once you have the execute command working you might
notice two things. First, it is possible to try to execute files that
are not programs (e.g., execute messag). If you do so,
the computer will attempt to interpret the bytes of
the messag file as machine language instructions and this
is unlikely to go well! Bonus feature #2 describes one way that
operating systems typically prevent such shenanigans. Second, after
you run a program the machine freezes up because the terminate
function enters its infinite loop.
To make it possible to execute more than one program or to enter
any commands after executing a program, change
the terminate function as follows. Instead of having
terminate enter an infinite loop, have it request that the OS reload
the shell into segment 0x2000 and execute it. With that
working, each time you enter a command or execute a program the shell
should return and prompt you for another command.
Wow! Look at that! If you don't think that's awesome, well, I feel sorry for you.
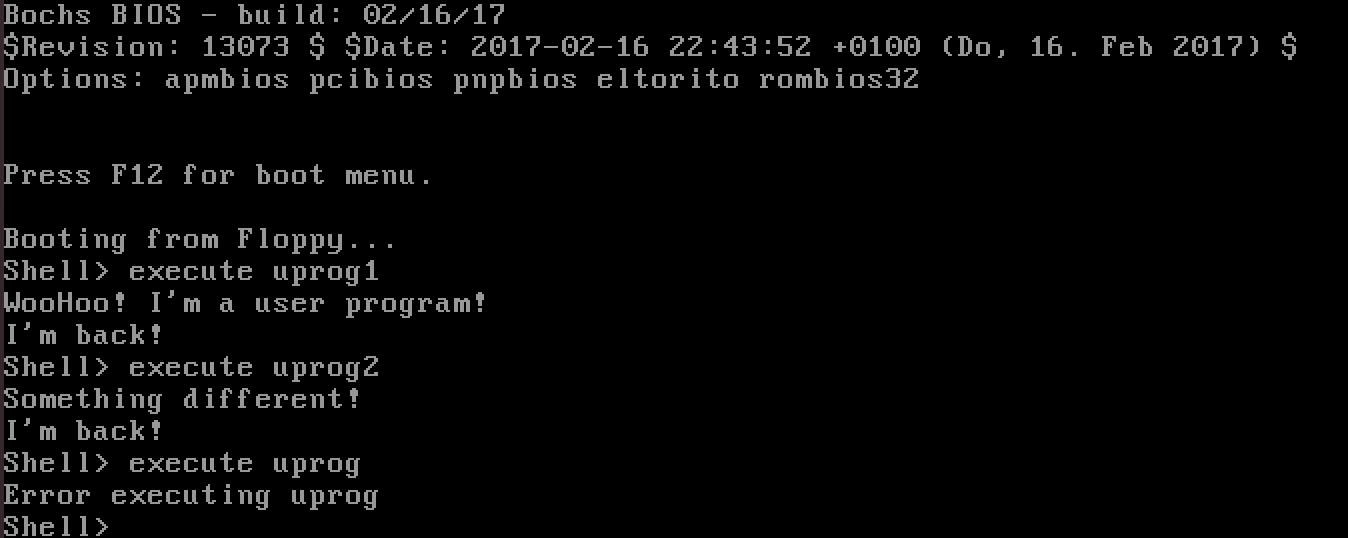
Sample screenshot of executing uprog1
followed by uprog2
Step 8: Finalizing your kernel
(If you choose to complete the bonus features, come back to this after completing them.)
Running your kernel should look pretty much like it did at the end
of Step 7. Review your code and make sure you have done appropriate
error handling and documenting of your code. You can remove the "I'm
back" print statement from execute, to make your final
solution look more real.
Bonus Features
I will provide only limited help (e.g., clarification questions) on the bonuses.
- The
readFilefunction suffers from the same security hole that thereadStringfunction suffered from in Project 2. Modify thereadFilefunction, the associated system call and user program library function to prevent buffer overflow attacks. - To prevent the accidental execution of a non-executable file,
many operating systems require that executable files begin with a
magic number. For example, all compiled Java files begin with the
hex number
0xCAFEBABE(though if a jar is compressed with Sun’s pack200 utility the magic number becomes0xCAFED00D). Similarly, all DOS and windows executables begin with an ASCII string containing the initials of Mark Zbikowski ("MZ" =0x4D5A) one of the early DOS/Windows programmers. Compilers for these systems always write the appropriate magic number into the executable files that they produce.Modify your kernel so that the execute system call will only execute programs that begin with a magic number that you define. The bcc compiler will not insert a magic number into your executable for you. Thus, you’ll need to create a post-processing program that reads the executable and rewrites it with the magic number in place. Your
executesystem call should then check a file for the magic number before transferring the file's instructions to memory and executing them. If the magic number is present, the program should be run. If it is not present, the system call should return -3 and the shell should print an error message. Add lines that add the magic number to each of your user programs (don’t forget the shell!).
Submission
GitHub Classroom will make a snapshot of your repository at the deadline. It contains only the code that you pushed to the repository. Your repository should contain your source code, any test files, and the updated Makefile.
I should be able to clone/pull your code and
run build.sh and then run.sh to see your
kernel running. You can (and should) follow the same process that I
will follow to verify that your code is all there and correct.
Assessment
You will be graded on:
- (115) Required Functionality
- kernel.c, shell.c, uprog1.c, uprog2.c, userlib.c, userlib.h
- Updated Makefile
- (15) Code style: proper comments/documentation, format, function decomposition
Acknowledgement
This assignment as well as the accompanying files and source code have been adopted with minor adaptations from those developed by Michael Black at American University. His paper "Build an operating system from scratch: a project for an introductory operating systems course" can be found in the ACM Digital Library.